
Zangi for PC: Download & Install on Windows 11/10 (Free 2026 Guide)
Do you want to use the Zangi app for PC without paying for a business account? While the official desktop version of Zangi app is paid, you can still enjoy Zangi on your computer for free using an Android emulator.
By following this guide, you can enjoy the complete Zangi app experience on your big screen, including private calls and anonymous chatting.
How to Download and Install Zangi on PC (Free Method)
We use BlueStacks emulator because it allows you to run the Zangi app / APK on your computer. This free tool creates a perfect Android environment on your Windows or Mac desktop, as Zangi is designed for mobile.
Step 1: Download BlueStacks Emulator
- First of all, go to Google and search for the BlueStacks official emulator.
- Or download it directly from “https://www.bluestacks.com.”
- Once the download is complete, click Install and wait for the process to finish.
Step 2: Install Zangi in the Emulator
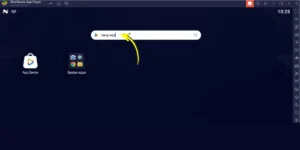
Open BlueStacks on your computer. You have two easy ways to install the app:
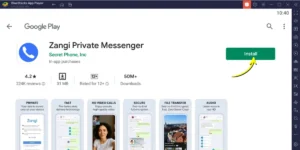
- Option A: In the BlueStacks search bar, type “Zangi Private Messenger” and hit enter. Click the Install button when the app appears.
- Option B: Download the Zangi .apk file; simply drag and drop the Zangi APK file directly into the BlueStacks window. It will install automatically in just a few seconds.
Step 3: Register or Login to Zangi on PC
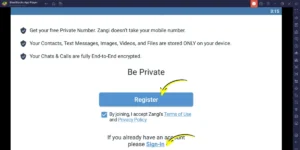
Once the installation is done, click the Zangi logo inside BlueStacks to open the app.
- New Users: Click Register and follow the simple steps to get your private Zangi Number.
- Existing Users: Click Sign In if you already have an account on another device.
Congratulations! You are now ready to enjoy Zangi on a bigger screen with all its privacy and HD calling features.
System Requirements: Zangi for PC (Emulator Method 2026)
| Feature | Windows (Recommended) | Mac (Recommended) |
| Operating System | Windows 10 or 11 (64-bit) | macOS 12 (Monterey) or later |
| Processor | Intel or AMD Multi-Core | Apple Silicon (M1/M2/M3) or Intel |
| RAM | 8 GB Minimum (for smooth calls) | 8 GB Minimum |
| Storage Space | 5 GB Free Space (for Emulator + APK) | 5 GB Free Space |
| Graphics | Updated Graphics Drivers | Standard Metal Support |
| Internet | Stable Wi-Fi / Ethernet | Stable Wi-Fi / Ethernet |
Note: For the best experience, ensure Virtualization (VT-x/AMD-V) is enabled in your BIOS settings. This allows the Zangi app to run at full speed on your PC.
Troubleshooting: Fixing Lag on Slow Computers
Is the Zangi app running slowly on your desktop? Emulators like BlueStacks can be “heavy,” but you can fix this with a few simple Windows settings. Follow these tips to get HD video calls even on older laptops.
Enable Virtualization (VT-x / AMD-V)
This is the most important step. Virtualization allows your PC processor to handle the Zangi app much faster.
- How to check: Press
Ctrl + Shift + Escto open Task Manager. Click the Performance tab and look for “Virtualization.” If it says “Disabled,” you need to turn it on in your BIOS settings.
Allocate More RAM to Zangi
If your call quality is low, blurry, or the app freezes, then:
- Open your emulator settings.
- Go to Performance or Engine.
- Set CPU Allocation to “High (4 Cores)” and Memory Allocation to “Enhanced (4 GB)” or higher.
Update Your Graphics Drivers
Zangi uses your graphics card for a clear video call.
- Right-click the Start button and select Device Manager.
- Expand display adapters.
- Right-click your graphics card (Intel, Nvidia, or AMD) and select Update driver.
Use “Low Data Mode” Inside Zangi
Even on a PC, you should turn the feature on if your internet is slow.
- Open Zangi in the emulator.
- Go to Settings > Low Data Usage.
- Toggle it ON. This will stop the app from lagging during voice calls.
Close Background Apps
Before opening Zangi, close heavy programs like:
- Google Chrome or Photoshop.
This gives the emulator more “room” to work, ensuring your private messenger never crashes.
Zangi for PC vs. Other Desktop Messengers
| Feature | Zangi (via Emulator) | WhatsApp Desktop | Telegram Desktop |
| Phone Number Required? | No (Zangi Number) | Yes | Yes |
| Server Storage | None (Serverless) | Stores on Cloud | Stores on Cloud |
| Data Usage | Lowest (6x Less) | High | Medium |
| Encryption | Military-Grade | End-to-End | Optional (Secret Only) |
| PC Performance | Fast & Secure | Depends on Phone | Fast but Cloud-base |
Pro Privacy Tips for PC Users
Tip 1: Use a “Zangi ID” Only: Never link your personal phone number in the emulator settings. This keeps your PC identity 100% separate from your SIM card.
Tip 2: Clear Emulator Cache: To stay extra safe, go to BlueStacks settings once a week and clear the “Zangi App Cache.” This removes any temporary files from your PC and protects your privacy.
Tip 3: Set a Lock Password: Inside Zangi settings on your PC, set a “passcode lock.” Even if someone opens your computer, they cannot read your Zangi chats.